One of the most important choices you will ever make when sourcing a manufacturing establishment that produces its own cable assemblies or wire harnesses is how they will crimp terminals onto the wires they need. Choosing wisely is based on advanced knowledge of the levels of quality that is achieved using each method available.
Smaller companies that are starting out or even larger companies have no formal training in the detailed aspects of wire processing which involves crimping terminals onto wire ends. They usually lean towards the cheapest method. The cheaper method essentially is to use hand-tool type pliers. Below are the steps involved in using a crimping hand tool;
- Load one crimp terminal at a time into the anvil and crimping area of the hand tool making sure the placement is correct so the anvil crimp tooling lines up and squeezes the terminal properly. (Very slow process compared to a crimp press feeding chained terminals automatically)
- The wire end if properly stripped is inserted into the crimp terminal area which requires a very coordinated operator to have any sort of repeatable quality and speed.
- Squeezing the pliers completely down to form the crimp action to the wire end. Most crimp tools have stepped locking mechanisms to ensure a full crimp is completed before opening.
It sounds simple enough to a person who isn’t aware of the quality that cannot actually be achieved using this method but on the surface it looks great if done correctly.
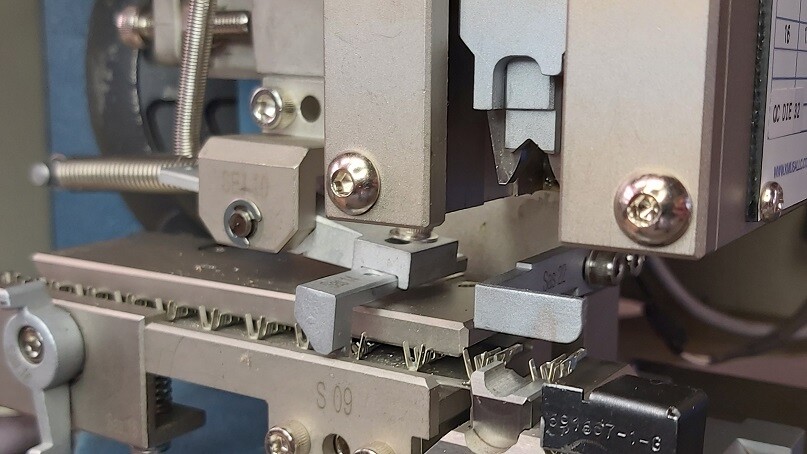
So let us get into the knowledge aspect of what a professional crimp is. We start with the knowledge that a properly crimped terminal onto a wire will be molecularly bonded between the two, meaning the wire and terminal electrically are one. This happens when you use a mil-spec crimping press with correct tooling in place which closes to an exact crimp height at high speed and multiple tons of pressure. It does not happen when you use hand tool pliers because a person cannot exert enough pressure at high speed to achieve this bonding. Sure the crimp terminal more or less looks the same but it is the electrical contact area (wire crimp) that is the key to the process. Hand tools should only be used for one off samples that will not reach the customer or field, but are for engineering personnel to verify wire lengths and correct wiring of a cable or harness as a finished sub product. I can tell you first hand that hand tool crimping has been the cause of many fires in the solar industry when used by electricians who had no idea that hand tools just won’t cut it. There is a much better method to crimping terminals onto wires. Novices tend to lean towards tooling up with say a typical 300 dollar hand tool as opposed to paying for a crimping press of 2 – 5 thousand dollars, and then a proper die for the crimp terminal that fits into the press for another 2-3k. Using a crimping press also has wire stops so the wire itself is inserted correctly every time thus eliminating operator error to a great extent and creating repeatability. The terminal also feeds into the crimping die automatically which speeds up the process and again eliminates operator placement error. A foot pedal activates the press cycle which happens very quickly and accurately squeezes and forms the crimp terminal to create that magic molecular bond.

It should be noted that almost every crimp terminal needs its own unique die. At C-T we have literally cabinets of dies that get changed out constantly throughout the day as wiring harness and cable assemblies get processed.
With professional tooling in place married with a robust quality system to guarantee first-off perfection of each setup, we are confident that the products we produce will stand up to the rigorous environments they go into